はじめに
「ちょっとした入力フォームを作りたいんだけど、バリデーションってどうやってやるんだろう?」
「ライブラリ入れるほどでもないんだけどな・・・」
この記事では、Reactで自前のバリデーション機能を組み込んだ入力フォームの作り方をシェアします。
実物はこちら
リポジトリはこちら
概要
この記事を読むことで、以下のような画面を作れるようになります。
※SUBMITボタンの下に表示しているものはデバッグ用です。
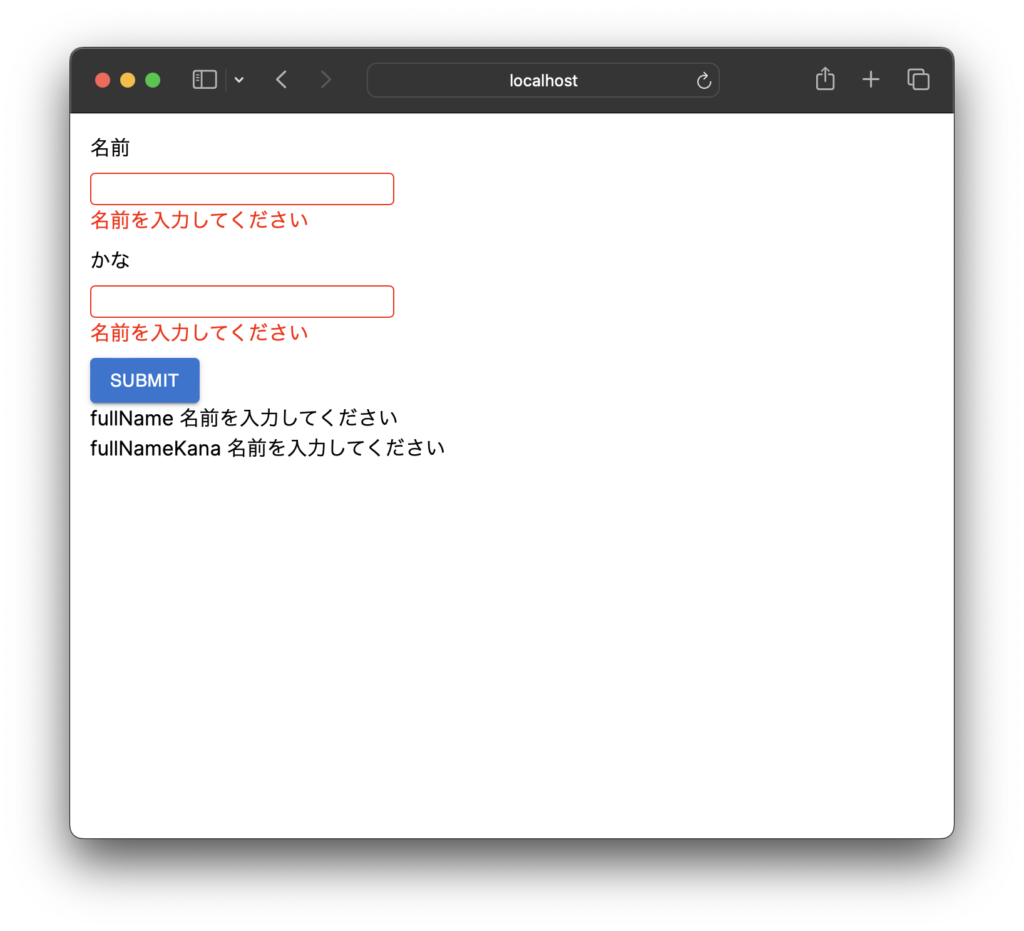
以下の仕様を想定して作っています。
- 「名前」「かな」の二つの入力欄がある
- 両方とも必須で、30字以内という制限がある
- バリデーションは、入力欄からフォーカスが外れたとき、SUBMITボタンが押されたときに行われる
- エラーメッセージは、それぞれの入力欄の下に赤字で表示する
- エラーのある入力欄は赤く表示する
実装
先にコード全容です。
'use client'

import {Box, Button} from "@mui/material";
import {ChangeEvent, FormEvent, useState} from "react";
import './style.css'
import {ValidateError} from "@/types/validate-scratch";


export default function ValidateScratch() {
    const [errors, setErrors] = useState<ValidateError[]>([]);

    const onSubmit = (event: FormEvent<HTMLFormElement>) => {
        event.preventDefault();
        const form = new FormData(event.currentTarget);

        const errors = validateForm(form)
        setErrors(errors)
        if (errors.length) {
            return
        }

        alert('No validate errors!')
    }

    const handleBlur = (event: ChangeEvent<HTMLInputElement>) => {
        event.preventDefault();

        const errorsWithoutTarget = errors.filter(error => error.key !== event.target.name)
        const newErrors = errorsWithoutTarget.concat(validate(event.target.name, event.target.value))
        setErrors(newErrors)
    }

    const validateForm = (form: FormData): ValidateError[] => {
        return [
            ...validate('fullName', form.get("fullName") as string ?? ''),
            ...validate('fullNameKana', form.get("fullNameKana") as string ?? '')
        ]
    }

    const validate = (propertyName: string, value: string): ValidateError[] => {
        const errors: ValidateError[] = [];
        if (value === '') {
            errors.push({
                key: propertyName,
                message: '名前を入力してください'
            })
        }
        if ((value as string).length > 30) {
            errors.push({
                key: propertyName,
                message: '30字以下で入力してください'
            })
        }
        return errors
    }

    const getErrorByPropertyName = (propertyName: string) => {
        return errors.filter(error => error.key === propertyName)
    }

    const getErrorMessageByPropertyName = (propertyName: string) => {
        return getErrorByPropertyName(propertyName).map((error, index) => <span key={`${index}-${error.key}`}>{error.message}</span>)
    }

    const isError = (propertyName: string) => {
        return getErrorByPropertyName(propertyName).length > 0
    }

    return (
        <main>
            <Box mt={2} ml={2}>
                <form onSubmit={onSubmit}>
                    <Box mb={2}>
                        <Box mb={1}>
                            <span>名前</span>
                        </Box>
                        <Box>
                            <input type="text" name="fullName" className={isError('fullName') ? 'error' : ''} onBlur={handleBlur} />
                        </Box>
                        <Box height="1rem" sx={{color: 'red'}}>
                            {
                                getErrorMessageByPropertyName('fullName')
                            }
                        </Box>
                    </Box>
                    <Box mb={2}>
                        <Box mb={1}>
                            <span>かな</span>
                        </Box>
                        <Box>
                            <input type="text" name="fullNameKana" className={isError('fullNameKana') ? 'error' : ''} onBlur={handleBlur} />
                        </Box>
                        <Box height="1rem" sx={{color: 'red'}}>
                            {
                                getErrorMessageByPropertyName('fullNameKana')
                            }
                        </Box>
                    </Box>
                    <Box>
                        <Button type="submit" variant="contained">SUBMIT</Button>
                    </Box>
                </form>
                <Box>
                    {errors[0]?.key} {errors[0]?.message}
                </Box>
                <Box>
                    {errors[1]?.key} {errors[1]?.message}
                </Box>
            </Box>
        </main>
)
}
各部分の解説
入力欄
項目名と入力欄がペアになっていて下部にボタンがある、よく見る形のUIかと思います。
                <form onSubmit={onSubmit}>
                    <Box mb={2}>
                        <Box mb={1}>
                            <span>名前</span>
                        </Box>
                        <Box>
                            <input type="text" name="fullName" className={isError('fullName') ? 'error' : ''} onBlur={handleBlur} />
                        </Box>
                        <Box height="1rem" sx={{color: 'red'}}>
                            {
                                getErrorMessageByPropertyName('fullName')
                            }
                        </Box>
                    </Box>
                    <Box mb={2}>
                        <Box mb={1}>
                            <span>かな</span>
                        </Box>
                        <Box>
                            <input type="text" name="fullNameKana" className={isError('fullNameKana') ? 'error' : ''} onBlur={handleBlur} />
                        </Box>
                        <Box height="1rem" sx={{color: 'red'}}>
                            {
                                getErrorMessageByPropertyName('fullNameKana')
                            }
                        </Box>
                    </Box>
                    <Box>
                        <Button type="submit" variant="contained">SUBMIT</Button>
                    </Box>
                </form>
ハイライトしている7行目と11行目をご覧ください。
7行目は入力欄を出力する input タグです。
エラーがあるときは class="error" が設定されること、フォーカス時(onBlur)に処理が実行されることをご確認ください。
11行目はエラーメッセージを出力する関数です。
引数で項目名を指定していることをご確認ください。
エラーの state と型定義
ValidateScratch関数の冒頭で、エラーの状態を管理する state を宣言しています。
export default function ValidateScratch() {
    const [errors, setErrors] = useState<ValidateError[]>([]);
errors の型は、プロパティにkey と message を持つ ValidateError 型の配列です。
export type ValidateError = {
    key: string,
    message: string,
}
サブミット時とフォーカスアウト時にバリデーションを実行する
仕様にあるとおり、バリデーションは入力欄からフォーカスが外れたとき、SUBMITボタンが押されたときに行われます。
    const onSubmit = (event: FormEvent<HTMLFormElement>) => {
        event.preventDefault();
        const form = new FormData(event.currentTarget);

        const errors = validateForm(form)
        setErrors(errors)
        if (errors.length) {
            return
        }

        alert('No validate errors!')
    }

    const handleBlur = (event: ChangeEvent<HTMLInputElement>) => {
        event.preventDefault();

        const errorsWithoutTarget = errors.filter(error => error.key !== event.target.name)
        const newErrors = errorsWithoutTarget.concat(validate(event.target.name, event.target.value))
        setErrors(newErrors)
    }
フォーム全体をバリデートする validateForm 関数と、入力欄ごとにバリデートする validate 関数があることをご確認ください。
handleBlur 関数の以下の処理は、バリデーションエラーをセットしています。
二つあるうちのもう一方の入力欄でエラーが起きている場合、そのエラーを消してしまわないよう filter でエラーを退避しています。
退避したエラーに、新しいバリデーションエラーを結合している(concat している)形ですね。
        const errorsWithoutTarget = errors.filter(error => error.key !== event.target.name)
        const newErrors = errorsWithoutTarget.concat(validate(event.target.name, event.target.value))
        setErrors(newErrors)
バリデーション処理
肝となるバリデーション処理です。
validateForm 関数は、各項目のバリデーションエラーを結合しているだけです。
スプレッド構文 ... をうまく使うとコードがスッキリするのでぜひマスターしましょう。
validate 関数は、引数で項目名と値を受け取ってバリデートします。
値が未入力のとき、値が30字を超えているときにバリデーションエラーとなります。
    const validateForm = (form: FormData): ValidateError[] => {
        return [
            ...validate('fullName', form.get("fullName") as string ?? ''),
            ...validate('fullNameKana', form.get("fullNameKana") as string ?? '')
        ]
    }

    const validate = (propertyName: string, value: string): ValidateError[] => {
        const errors: ValidateError[] = [];
        if (value === '') {
            errors.push({
                key: propertyName,
                message: '名前を入力してください'
            })
        }
        if ((value as string).length > 30) {
            errors.push({
                key: propertyName,
                message: '30字以下で入力してください'
            })
        }
        return errors
    }
エラー表示とエラー判定
エラーの state には、「名前」と「かな」両方のエラーが入ります。
そのため、項目名を指定してエラー表示とエラー判定を行う仕組みにしています。
getErrorByPropertyName 関数は、指定した項目のエラーオブジェクトを配列で返します。getErrorMessageByPropertyName 関数は、指定した項目のエラーメッセージを配列で返します。isError 関数は、指定した項目にエラーがあるかを判定します。
    const getErrorByPropertyName = (propertyName: string) => {
        return errors.filter(error => error.key === propertyName)
    }

    const getErrorMessageByPropertyName = (propertyName: string) => {
        return getErrorByPropertyName(propertyName).map((error, index) => <span key={`${index}-${error.key}`}>{error.message}</span>)
    }

    const isError = (propertyName: string) => {
        return getErrorByPropertyName(propertyName).length > 0
    }
おわりに
いかがだったでしょうか?
今回は自前のバリデーション機能を組み込んだ入力フォームを作ってみました。
validate 関数は文字列専用で必須固定、桁数も30桁固定になっています。
実際の画面では、もっと柔軟なバリデーションが求められると思います。
やり方はいろいろあると思うので、チャレンジしてみたい方はぜひ作ってみてくださいね。
ハコラトリは、Reactを習得したい駆け出しエンジニアを応援しています。
Reactレシピでは、これからもReactで色々なUIを作って紹介していきますので、「こんなUIを作ってみてほしい」「こんな場合はどうすれば?」といったアイディアを募集中です!
コメントお待ちしております。

コメント